Category: Home Improvement

Why You Should Consider Insulation Removal

Insulation plays a critical role in keeping your space comfortable. If your old insulation is no longer doing its job, you should consider removing it and getting new insulation installed. Contact Perth Insulation Remover now!

Insulation removal can be a messy process, so it’s important to take precautions when handling it. Read on to learn more about the benefits of hiring a professional service for this task:.

Insulation removal is the systematic process of removing existing insulation materials from walls, attics, and crawl spaces. This is often necessary when the insulation becomes damaged, contaminated or outdated. It can also be used to make room for more efficient and safer insulating materials such as fiberglass, cellulose, or foam. Insulation removal is essential for maintaining a healthy indoor environment and preventing damage to the building structure.

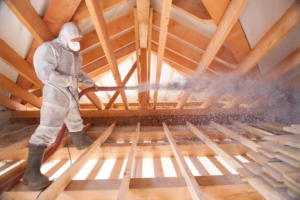
Working with blown-in insulation can be hazardous. The material contains many tiny, airborne particles that can irritate the skin, eyes, and respiratory system. It is crucial to wear proper PPE to avoid contact with the insulating material and prevent inhalation of these harmful particles. This includes long sleeves, pants, gloves, a mask rated for insulation particles and closed-toe shoes.

It is also important to clear the work area and cover furniture and floors that cannot be moved to protect them from debris and dust. In addition, the work area should be well-ventilated to prevent inhalation of airborne particles. A powerful vacuum is recommended for cleaning the workspace after each use to reduce the amount of dust and insulation particles that are dislodged during the removal process. It is also helpful to set up a barrier or warning signs to keep others from entering the workspace.

Blown-in insulation is a popular choice for homeowners because it provides high energy efficiency and good sound reduction. However, it is important to check the space for moisture, pests, or structural issues before and after removing the insulation. These problems should be addressed immediately to prevent further damage and expensive repairs.

Insulation removal can be a challenging project for homeowners, especially when dealing with large areas. It is best to hire professional help for projects requiring significant amounts of insulation or when the safety of the home’s occupants is at risk. The professionals will follow a structured plan to ensure the job is completed efficiently and safely. Moreover, they will ensure the removal and installation of new insulation is completed correctly. This will maximize energy efficiency and the comfort of the occupants.

Cleanliness

Old insulation can act as a home for a lot of allergens like dust, mold spores and other pollutants that affect indoor air quality. When these contaminants circulate through a household, they cause stuffiness, sneezes and other respiratory issues. Removing this material can improve a home’s comfort and reduce energy consumption by keeping indoor air clean and breathable.

Insulation removal can be a messy task, and it is important to take precautions to prevent contaminating areas of the house other than the attic space where the work is taking place. Placing plastic sheeting over items in living spaces and using adhesive zipper doors for access to the attic are helpful tools for minimizing the spread of dust and other materials during the cleanup process. Using a vacuum with a filtering attachment and placing a tarp under the bags while filling them will also help to keep the attic clean and limit contamination beyond the work area.

Spray foam insulation can be more difficult to remove and requires special tools and techniques. When working with this material, it is important to wear a face mask to avoid inhaling chemicals and foam shavings that may be released during the removal process. It is also helpful to have a rag or sponge that can be moistened with lacquer thinner or nail polish remover to soften any hardened foam and make it easier to cut or scrape away.

Professionals who handle this type of work are also well equipped to clean up the workspace and prevent contamination outside of the attic space. They will use a vacuum with an industrial hose to thoroughly clean the attic area and any remaining debris. They will also use a commercial trash bag to transport full waste bags for proper disposal. In addition, they will clear vents to ensure proper airflow in the attic while they work.

Efficiency

Insulation removal is the process of removing existing insulation material from walls, attics, and crawl spaces to make way for new or improved insulation. This is often necessary when old insulation becomes contaminated or damaged by moisture, mold, pests, or other environmental factors. It can also be needed when home upgrades require the replacement of existing insulation materials to improve energy efficiency and occupant comfort.

The condition of a property’s insulation directly impacts its resale value, as well as its utility and comfort for current residents. Old or contaminated insulation may lead to high energy bills and reduced indoor air quality. In addition, it can create health hazards and pose structural risks for the home. To ensure a safe and efficient insulation removal process, it is important to work with experienced professionals who have the equipment and knowledge required to safely and quickly remove and replace insulation.

Depending on the type of insulation, age, and conditions, different techniques can be used to remove it. For example, a professional might use a small rake to break up the clumps and allow for more effective vacuuming. Additionally, they might moisten the insulation slightly to loosen it up before vacuuming. This can help reduce the likelihood of damaging the home or insulation, and it can speed up the process.

If the wrong type of insulation was originally installed, it might need to be removed and replaced with a different material to meet current standards. Newer insulation materials can offer better energy efficiency and cost savings, as well as improved occupant comfort and indoor air quality. In addition, if a home’s existing insulation is damaged, it can be replaced with more cost-effective alternatives that can save homeowners money on energy bills.

The right insulation can significantly increase a home’s resale value and make it more appealing to buyers. Professional insulation removal and replacement is a time-consuming and labor-intensive process that requires specialized equipment. However, when done properly, it can improve the energy efficiency of a home and reduce its carbon footprint. Additionally, a clean and contaminated-free insulation can improve a property’s resale value.

Durability

Insulation is meant to provide a layer of protection against airborne contaminants and to regulate temperature in the interior of a home. Over time, however, insulation can become damaged due to moisture damage, mold growth, pest infestation, and other factors. In these cases, it is important to replace the old insulation with new materials. This helps to ensure a healthy and comfortable living environment, as well as improve energy efficiency and prevent health risks.

Insulation removal is a complex process that requires specialized equipment and knowledge of safety precautions. Unless you are skilled in the field, it is generally recommended to hire professionals for this task. This helps to ensure that the process is done properly, avoiding damage to the structure of the house. It also allows for the proper disposal of hazardous material, ensuring that it does not pose a threat to the home’s occupants.

Before the insulation removal process can begin, the attic space must be cleared of furniture and boxes to create space for the work. It is also important to wear protective gear, such as masks, gloves, and goggles. Additionally, an industrial-grade vacuum is usually brought in to remove the insulation. Once the insulation is removed, it should be bagged and securely transported to a designated disposal area or facility.

Once the insulation is removed, it is important to thoroughly clean the affected areas to eliminate any lingering dust or contaminants. This can be done by vacuuming, wiping down surfaces, and spraying with disinfectants or mold inhibitors. This is particularly important in homes where old insulation may contain contaminants such as asbestos, which can pose health risks when disturbed.

The Meyer Versa-Vac insulation removal vacuum is a durable and reliable system designed for a variety of applications. It can be used by insulation contractors, pest management contractors, and disaster restoration contractors to safely remove contaminated insulation and dispose of it in accordance with local regulations. Its durable design provides added protection against damage to sensitive wires in the attic and a high level of suction that makes it ideal for removing insulation from crowded spaces.

Kitchen Renovation – Choosing Cabinets, Countertops and Lighting

Kitchen Renovation is all about enhancing the condition, appearance and functionality of your existing space. This is done without increasing the size of the kitchen.

Kitchen Renovation

The scope of a kitchen renovation can vary from a simple cosmetic refresh to a full-scale overhaul that may involve tearing down walls and reconfiguring the layout (permits are often required). Generally speaking, the most expensive upgrades are the ones that add most value.

Cabinetry is the foundation of any kitchen. It defines the space, provides storage and display space for special dishes, cookware, art and more. It can also add a great deal to the resale value of a home. With that in mind, it is important to prioritize functionality and style when selecting your cabinets.

Many homeowners are tempted to replace all of their existing cabinets in order to make dramatic changes. However, if your budget is limited, there are other options. For instance, adding a fresh coat of paint can give your cabinets a new look and feel without spending too much money. Another option is “refacing” your cabinets, which involves covering the current cabinet boxes with a laminate or veneer and replacing the doors and drawer fronts.

Another way to change your kitchen cabinetry is to use pegboard as an alternative to a standard door, creating a one-of-a-kind and useful cabinet remodel. This allows you to store items that might otherwise be stacked on top of each other, such as tin cans or pot lids, in a more organized fashion. Pegboards can also be installed over old linoleum or tile, helping you to save money on the cost of flooring and countertops.

When selecting a finish for your cabinets, keep in mind that natural woods like cherry and maple will last longer than painted finishes such as melamine or vinyl. Also consider adding features like soft-close hinges and drawer glides to improve your kitchen’s overall functionality. This is especially true if you have children, as slamming cabinet doors can damage them over time.

If you are looking to add a little bit of flare, consider applying wallpaper or contact paper to your cabinet faces to create a unique design. You can even install sliding trays in your lower cabinets to store and organize small items like snack packs, cooking utensils and spices. The key is to choose something that fits with your personal taste and will complement the other elements of your kitchen. A good kitchen designer can help you achieve the look you want without compromising the function of your space.

Countertops

Countertops are more than just the work surface in a kitchen, they add to the overall style and function. Countertops are available in a wide variety of colors, styles and materials, so choosing the right one for your kitchen renovation is key to getting the look you desire.

Granite countertops are a popular option due to their beauty and durability. They’re also resistant to heat, moisture, scratching and staining. However, they can be quite expensive, so it’s important to consider your budget when deciding on this countertop material.

Quartz surfacing is becoming increasingly popular as an alternative to granite countertops because of its beauty and longevity. It’s created by binding natural quartz crystals with a resin-based product, which allows for a wide range of color and pattern options. Quartz is non-porous, meaning it’s easy to keep clean and free from bacteria. Quartz is also heat-resistant, though it is recommended to place a barrier between hot pots and pans and the countertop.

Wood countertops are another stylish and durable choice that offers a natural, warm aesthetic to any kitchen design. They’re available in a variety of shapes, sizes and finishes, and can be customized with laser engravings, integrated bowls, or even a butcher block design. Regular oiling is required to maintain their appearance, but if done regularly they can last for years to come.

Laminate is a less expensive, but still highly versatile countertop material. It comes in a large variety of patterns and colors, and can be matched with almost any other countertop material for a coordinated look. However, laminate is vulnerable to heat damage and needs to be sealed regularly to prevent mold and bacteria from forming.

For a bolder and more contemporary look, recycled glass can be used to create a one-of-a-kind countertop. This material is made from clear acrylic or concrete with embedded glass shards that can be in a wide range of colors, from crisp neutrals to bright confetti hues. While this is an eco-friendly option, it’s important to remember that the shards can be sharp and require proper maintenance.

Flooring

The flooring is the base of your kitchen, so it should be sturdy and durable. It should also be easy to clean and maintain. The type of flooring you choose will depend on your needs and budget. For example, a vinyl floor can be easily cleaned and is suitable for most kitchens. It is also affordable and water-resistant. On the other hand, hardwood floors add a touch of elegance to any kitchen and can increase your home’s value.

A kitchen renovation is an investment, so it’s important to plan your budget carefully. You don’t want to be halfway through the project and realize that you haven’t included all of the necessary expenses. A professional kitchen design service can help you create a realistic budget for your renovation.

Once you’ve determined the size and scope of your kitchen renovation, it’s time to decide what materials and finishes to use. The first step is to choose the type of flooring you’d like to install. There are many different options available, including tile, wood, laminate, and concrete. Each type of flooring has its own advantages and disadvantages, so it’s important to research your options before making a decision.

If you’re on a tight budget, you can still update your kitchen with inexpensive upgrades. For instance, you can replace the hardware on your cabinets or spruce up the backsplash. You can even paint the room with a new color to give it a fresh look.

A full kitchen renovation is a more involved remodel that usually involves changing the layout of the room. This may include moving the sink or fridge. It can also involve tearing down walls and adding a pantry. A full kitchen renovation can take up to a year to complete, so it’s important to have a good budget and hire a reputable contractor.

The original tan walls, orange-toned cabinetry and dark flooring in this kitchen created a dated look. Removing the doors and converting two upper cabinets into open shelving helped lighten the space visually. Graphic porcelain tiles and new appliances finish off the modern look.

Lighting

Lighting is one of the most important aspects of your kitchen renovation. Not only does it illuminate the space so that you can move around, but it also sets the mood and tone for the room. Whether you’re cooking a family meal or chatting with friends, the right lighting can make the difference between a drab and dark space and a warm and inviting atmosphere.

When it comes to kitchen lighting, a layered approach is ideal. Recessed downlights are great for general illumination, while pendant lights and chandeliers are perfect for illuminating kitchen islands and dining areas. Look for energy efficient LED options to help cut down on your energy costs and to ensure your fixtures are safe and effective.

LED strip lights are a flexible kitchen lighting solution that can be used for task lighting under countertops, along cabinet edges, and in other tight spaces. These strips are easy to install and provide a bright, even light that’s ideal for kitchens. You can also use them to highlight decorative items like fine china or vases.

Another great option for kitchens is counter lights, which can be placed over kitchen islands and workspaces. These lights can be angled to focus on specific tasks, and they are available in a variety of stylish designs. They are also more energy-efficient than traditional incandescent bulbs and offer a cooler operating temperature, making them safer to touch and easier to replace.

A well-lit kitchen can improve your mood, boost productivity, and increase the value of your home. By choosing the best lighting solutions for your needs and selecting fixtures that complement your kitchen’s design, you can create a functional and beautiful space to enjoy for years to come.

If you’re thinking about renovating your kitchen, it’s important to create a budget and timeline before you start work. This will help you stay on track and avoid overspending. To avoid any surprises, it’s also helpful to consult with a designer before you begin your project. A professional can help you select the perfect finishes, materials, and features to make your dream kitchen a reality.

Chimney Inspection Levels

Many home inspectors will recommend a chimney inspection in addition to the standard home inspection. A chimney can be hiding significant damage that can lead to dangerous carbon monoxide leaks and a house fire.

A reputable, CSIA certified chimney sweep can spot these issues before they become major problems. Having a chimney inspection done before buying a home will give buyers peace of mind and can reduce homeowners insurance rates. Contact Chimney Inspection Baltimore now!

A chimney inspection is a visual assessment of the structural integrity and functionality of the chimney. Its main purpose is to identify any problems or hazards that could compromise the safety and functionality of the fireplace, flue and venting system. Chimney inspections can be broken down into different levels based on the scope and complexity of the chimney and its surrounding structures.

Level 1 is the most basic type of chimney inspection. It is typically performed for easy-to-access chimneys or fireplaces that have been used regularly and under the same conditions. A professional technician will verify the basic soundness of the chimney structure and the flue, as well as check for basic appliance connections. They will also make sure that the chimney is free of combustible deposits and flammable debris.

Chimneys are prone to water damage because of their porous masonry construction. This damage can lead to leaks that can affect the chimney’s structural stability and occupants’ health and safety. Water damage can also speed up the chimney’s natural deterioration process, which is why it’s important to examine the chimney for any signs of moisture problems on a regular basis.

An essential part of any chimney is its lining, which is designed to reduce the amount of smoke and gas emitted during combustion. A deteriorating lining can increase the risk of chimney fire and carbon monoxide poisoning. Chimney professionals will look for cracks and gaps in the lining as well as a buildup of creosote, which is a highly flammable substance.

When assessing the chimney, it’s also important to inspect the firebox and grate. Look for cracks, rust, and other signs of wear. It’s also important to examine the damper for proper operation and a clear path of airflow.

Chimneys that have been used for a long time often need to be relined due to the breakdown of the original lining. An experienced chimney technician can determine if a new liner is necessary and recommend the best course of action.

Level 2 Inspection

This level is often referred to as the middle ground between level one and level three. It allows homeowners to get a more in-depth analysis of their chimney without being too invasive or damaging the structure. This is achieved with closed-circuit cameras that can be used to scan the entire chimney, including the hard to reach areas of the flue.

Your chimney sweep may recommend this inspection for a variety of reasons. For example, if you’ve made a change to your fireplace system, like switching the fuel source or installing a new insert. In these circumstances, a level two inspection can identify if any modifications need to be made in order to improve drafting or safety. It’s also important to conduct this type of inspection before buying or selling a home. It will provide potential buyers with peace of mind that the chimney is in good condition and identify any issues that could be costly down the road.

During a level 2 inspection, the inspector will check for proper clearance from combustible building materials and scan the entire chimney using a closed circuit camera to inspect hard to reach areas of the flue. They will then provide a written report detailing their findings. This report will describe the overall condition of the chimney and include an estimated cost for any necessary repairs. As with any type of inspection, it’s important to schedule routine maintenance to avoid more expensive, long-term repairs. The best way to prevent problems is by having your chimney regularly swept and having a level 1 chimney inspection performed annually.

Level 3 Inspection

A level three inspection involves a level two inspection plus verification of public and confidential vehicle identification numbers on, at the inspector’s discretion, some or all components to determine that the vehicle meets statutory requirements for highway use. General III is a good choice for new suppliers that you’re unsure of or long-term suppliers with frequent quality issues. This level also allows for additional inspections of brake systems; cargo securement; coupling devices; exhaust systems; frames and suspensions; and van and open-top trailer bodies.

Level 4 Inspection

A chimney that’s deteriorated or damaged can be dangerous to the people and animals living inside your home. It can also damage your home, causing serious structural issues and costly repairs. A regular inspection by a certified chimney sweep is the best way to ensure your fireplace and chimney are in good working condition.

Your chimney is comprised of bricks and mortar that’s exposed to the elements. Over time, this can cause cracks and other damage that weaken the structure and lead to leaks. A professional chimney sweep will look for these issues and repair them if necessary.

The chimney crown, which is a concrete cap at the top of the chimney, should be free from cracks or gaps. It should also be surrounded by a protective masonry lining. The flashing, which is a strip of metal that seals the chimney at the roof, should be in good condition and properly secured. Your chimney sweep will also check the firebox walls for damage and cracks, and make sure the damper opens, closes and seals properly. He or she will also examine the liners, whether they’re made of clay tiles, steel or a poured-in-place material, and make sure they’re in good shape. Chimney liners are designed to protect the masonry structure from the hot, flammable gases produced by wood and other fuels.

No lining lasts forever, however. Over time, heat and weather can cause it to crack or break. A cracked or broken liner leaves the interior chimney masonry exposed to extreme heat and moisture, which can lead to serious structural problems and chimney fires.

When your chimney liner is in poor condition, your technician will recommend either a repair or replacement. Repairs can usually be done at a much lower cost than replacing the entire chimney system, which can cost thousands of dollars or more.

It’s important to have your chimney inspected on a routine basis to prevent damage and keep your family safe. A certified chimney sweep has the tools and experience to conduct a thorough inspection, which can identify problems that you might miss during a DIY inspection.

Preventing Fires

A chimney fire can destroy a fireplace, injure a family and cause costly damages to the home. The risk of chimney fire is why the National Fire Protection Association recommends that homeowners have their fireplace and chimney inspected and cleaned annually. A professional sweep can spot problems that a homeowner might miss, such as an improperly installed or damaged chimney liner or a crack in the chimney flue.

Chimney fires are the leading cause of residential house fires and account for billions in property damage and thousands of injuries each year. A chimney fire usually starts with a spark or ember that ignites soot and creosote, which then rapidly spreads through the chimney to other parts of the house. Having a well-maintained chimney system and regular chimney sweeps can prevent soot, creosote and other hazardous deposits from building up inside the flue and igniting a chimney fire.

A professional chimney sweep will use a brush that fits on a rod that goes down the chimney to scrape away the accumulated soot and creosote. They also wear gloves and masks to protect themselves from the dust and ash that can cling to clothing and rugs. After the soot and creosote are removed, the chimney sweep will do a visual inspection to make sure everything is in good condition.

The sweep may need to remove twigs, leaves and animal nests from the fireplace and chimney structure as well. When these materials obstruct the chimney, they can push dangerous carbon monoxide into the home. This odorless, colorless gas is a deadly poison and can be fatal at high levels. A clogged chimney also allows smoke to back up into the home, staining rugs and ruining furniture. A chimney sweep will clean out the obstructed area and restore proper airflow, preventing these issues.

If you think that your chimney might be in need of a sweep, it is important to find a certified chimney service company with a solid reputation and experience. A chimney sweep should be a member of the Chimney Safety Institute of America (CSIA) and carry a liability insurance policy to protect your property from any damages caused by the chimney cleaning process.

Cabinet Refinishing – Give Your Cabinets a New Look

Cabinet Refinishing San Jose CA involves staining or painting your existing cabinets. Nothing is removed from your cabinet bases or frames and this process can be up to 70% cheaper than refacing.

Cabinet Refinishing

If your cabinets are in good shape but are showing signs of wear and tear, refinishing them will provide an instant refinement. However, this process can be challenging and should only be done by a professional.

Refinishing is a complex process, one that requires skill and experience to achieve good results. If you’re not sure that you can handle it on your own, consider hiring a professional.

The first step is to prepare the cabinet surfaces for painting by sanding them with medium-grit sandpaper to remove any existing finishes and create a smooth base for the new coat of paint. This will also help to get rid of any scratches or dents in the surface. Fill any holes or gaps in the wood with wood filler and sand again until it’s super smooth and ready for a fresh coat of paint.

After sanding, the cabinets should be thoroughly cleaned to ensure that all traces of grease and grime are removed before applying the new finish. This will also help to make sure that the new coat of paint adheres properly. A mild cleaner such as TSP (trisodium phosphate) or Simple Green will usually work, but you may need to use a more potent chlorine mixture if there are heavy grease deposits on the surface of your cabinets.

Once the cabinet surfaces have been cleaned, they should be primed to seal in the sanded areas and provide a clean surface for painting. The primer should be allowed to dry completely before continuing with the next steps.

During the refinishing process, it’s important to remember that you should always be working in a well-ventilated area and using the appropriate respiratory protection. This is because sanding can generate a lot of dust and fumes that can be harmful to your health if inhaled.

If your cabinet doors are made of thermofoil or laminate, then they won’t be able to accept new paint or stain and will likely need to be replaced. If your cabinet doors are made of real wood, then they can be refinished and will look great for many years to come. Just be aware that the natural oils in your hands will eventually break down acrylic paints, so they’ll begin to chip and fade over time if not properly cared for.

The Materials

If you’re planning on refinishing your cabinets to give them a new look, you’ll need some basic materials. These include a screwdriver, sandpaper (medium and fine grit), wood filler, putty knife, and painter’s tape. You’ll also want to have some drop cloths, which will protect the surrounding surfaces from paint splatter.

Before you begin the refinishing process, you should remove all of the hardware from your cabinets and label it so that you can reinstall it when the project is finished. You’ll also need to clean the cabinet surfaces thoroughly with a mild cleaner to ensure that any dirt and grease is removed before you apply a new coat of paint.

If your cabinets have a glossy finish, you’ll need to use a deglosser to roughen the surface so that the primer or paint will adhere properly. You should also mask off any areas you don’t want to paint, such as the inside of the drawers.

The next step in the refinishing process is to sand the surfaces of the cabinet boxes and doors. This will create a smooth base for the new stain or paint, and it’s important to sand to the proper level so that you don’t end up with a bumpy or uneven finish. After sanding, you should wipe down the surfaces and allow them to dry completely before moving on to the next step.

Once your surfaces are dry, you’ll need to apply a coat of primer. You can purchase a cabinet primer at most home improvement stores, and it’s important to follow the manufacturer’s instructions for applying the product. Once the primer is dry, you’ll need to sand again to make sure that all of the imperfections are even and smooth.

Once your surfaces are ready to be painted, you’ll need a high-quality cabinet paint sprayer. This will make the job much easier and faster, and it will help you achieve a professional-looking result. Choose a cabinet paint that is specifically designed for refinishing cabinets, and be sure to use a sprayer with a wide nozzle. This will help you get the most coverage possible and avoid any drips or runs.

The Cost

Cabinets are one of the most used items in a kitchen and over time they can become damaged from wear and tear, scratches, or even cracks. This damage can affect the overall look of a kitchen. Cabinet refinishing is an option for homeowners to help change the look of their cabinets without replacing them. Refinishing involves stripping the existing cabinets and sanding to give them a new coat of stain or paint. This can be an easy DIY project if you have the necessary equipment and time. Refinishing can also be done professionally by a qualified company.

The cost of refinishing cabinets depends on the material and style of the cabinets, the type of finish chosen (stain or paint) and any repairs that need to be made to the cabinets. Generally, refinishing is less expensive than refacing or replacing the cabinets.

Before the refinishing process begins it is important to ensure that all of the damage has been repaired and the surface is clean. This will make the final product look better and last longer. The refinishing process can be done by hand or with a paint sprayer. Using a sprayer is faster and more efficient than using a brush or roller. A professional will use a high-quality sprayer that produces an even coat and is resistant to moisture.

Choosing between refacing and refinishing is a personal choice for many homeowners. Neither is ideal for every situation. Refacing is a more extensive project than refinishing and requires the installation of new doors and drawer fronts. Refacing can be more expensive than refinishing, but it is an option that offers more flexibility. If you are looking for a more dramatic change, refacing may be the right choice.

If your cabinets are in good shape but you want to change the look, refinishing is an affordable option. Refinishing can be completed in a day or two and is one of the cheapest methods of changing the look of your cabinets. However, if you have larger structural issues with your cabinets then refinishing or refacing may not be enough to solve them.

The Time

There are a few factors that determine how long it takes to complete your cabinet refinishing job. The first is how much work needs to be done. If you want your cabinets painted a new color, the job will take longer than if you’re just going to stain them. The second factor is how much experience the company has. Look for a company that has been in business for a while and has plenty of reviews online. This will give you an idea of how well they perform and whether they’re a good fit for your project.

The first step is to remove the cabinet doors and hardware. Then the surfaces are sanded, some by hand and some with power equipment, to prepare them for a new finish. This is usually the most time consuming part of the process. The length of time it takes to sand depends on the type of wood and how dark you want the finished product to be. It can also vary depending on how rough or smooth the surface is. Doors with ornate trim or windows will take more time to sand than simple, flat doors.

A new coat of primer will then be applied. Primer creates a smooth surface for the paint to adhere to, and it helps hide any imperfections in the wood. After the primer is dry, the final coats of paint can be applied. A single coat of paint is usually sufficient unless you’re going from a very dark color to something lighter, in which case two coats are recommended.

Cabinets are subjected to a lot of use and moisture, so they can begin to chip and peel over time. This can be a real problem, but it’s easy to fix with a fresh repaint. The best way to ensure that your cabinets last is to hire a professional. They’ll have the tools and experience to get the job done right, and they’ll typically stand behind their work with a warranty.

Before hiring a company, ask for recommendations from friends and family members who’ve had similar work done on their homes. Once you have a few companies in mind, compare their prices, services, and warranties before making a decision.

Navigation